Tuesday, 14 May 2019

Turning file handles

After sharpening the carcasse saw, I decided to make a different file handle that was slightly longer.

I started with a quick drawing on a bit of plywood. I'd then use the plywood as a template, if I ever decided to make more handles based on that pattern.


Compared to the handle I turned before


Developed so I can take direct measurements with calipers at key points


Once again, an off-cut of cherry


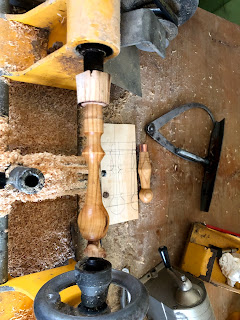
Mounted on the lathe, turned into a cylinder and marked.


I used the parting gouge and the calipers to reach the correct dimensions in the key spots. I used a carbide gouge to connect the parts together... I reversed the lathe rotation and sanded the  handle to 400 grit before building on the finish (BLO, BLO, shellac, 600 grit, shellac, 600 grit, carnauba, buff).

Here's the handle off the lathe, before the final steps (cut off, ferrule, drill tang hole).


Drabble and Sanderson backsaw renovation

A while back, I bought an old Drabble and Sanderson back saw. It was quite dirty but should clean up to a very good saw, based on other saws from the same maker already in my saw till. As the saw plate wasn't very deep, I decided to joint the teeth and reconfigure it as a 14 ppi carcasse saw.


The first step was making a split nut tool as I seem to have lost my previous shop-made one. I used a cheap spade bit for that... a quick trip to a bench grinder and a few minutes with a file later, I had a correctly sized tool for the task.


The saw fully taken apart
Let's start by fully removing the old teeth and cleaning the plate.

I ordered a pack of proper saw files from Dictum as I suddenly realized I didn't have files fine enough for 14 ppi. While waiting for the files to be delivered, I pre-cut the teeth spacing with a hack saw... in the end, that was quite a waste of time and energy as it didn't improve the results nor saved any work.

Teeth being cut in... astute readers will now notice that I forgot to order something with the files.

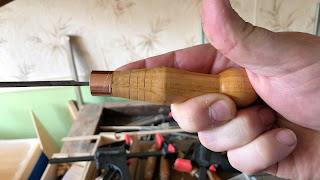
After getting massive blisters on my right thumb from the sharp tang on the file, I realized that a file handle would be neat... so I quickly turned one from some leftover cherry.


It was a marked improvement and I quickly finished sharpening the saw. Here's the reassembled saw, somehow I forgot to take pictures of the extra steps I had to go through (straightening the brass screws, cutting new threads on the screws, drilling slightly larger holes in the plate, ...).  The saw plate got a generous coating with carnauba wax and was buffed. The handle was cleaned, received two coats of BLO and buffed with a BLO/carnauba mix.


The saw was drifting to the left, so I quickly stoned the left side of the plate until it cut plumb. The saw is now seeing daily use. 


Wednesday, 17 April 2019

Custom canvas tool roll

Last year I bought a set of English plough irons that happened to come in an old tool roll. As it was busted, I thought about making a new roll for the irons.


A quick cleanup with 400 grit sandpaper and mineral spirits to clean the irons.


A high-level, not proportional, plan of how the roll will be made. The entire thing will be made from 2 layers of antique canvas my wife stashed away ages ago. The roll proper will be 25cm by 25cm, with a 14cm flap covering the tangs and a 7cm side flap.

 The fun begins... cutting the fabric panels to size. As it's a very large roll of fabric, I was able to cut the components as continuous panels. The main body and tang flap became an 80cm by 27cm panel (24+14+2 times two), the side flap became a 16cm by 27cm panel and the tool holder became a 30cm by 27cm panel)

Main body and side flap cut to size (I actually made the side flap too small and redid it)

 Side flap with seams penciled in
 The tool packet panel with 8 equal pockets... geometry is your friend. There was a mistake here too and I should have allowed some space on the sides as the fabric is quite thick
 Tool pocket stitched to the main body
 Let's dry test the fit of a plough iron
 The new side flap, at the correct size.

The side flap stitched to the main body

 The closure mechanism in place, can you spot the error? Now it's time to stitch the seam all the way around, leaving a 10cm opening to turn the tool roll inside out.
 Tool roll turned out, pressed and fully loaded.
 Tool roll almost finished... the next part of the project is to treat the outside of the tool roll to make it water proof. A similar process to Filson's famous "tin cloth". This will come in a follow-up post.

Wednesday, 22 August 2018

Christmas in August?

Today a couple of heavy parcels were waiting on my desk in the office :)

The first parcel is a mixed set of plough irons from good british manufacturers I bought on ebay.co.uk for pocket change... it contains a few J Howarth, Sorby, Marples, Varvil. J Howarth is quickly becoming a favourite tool maker of mine. I now have 2 infill planes (a smoothing plane and a shoulder plane) with his irons and they are really nice to use. The plough iron set has duplicates (1,2,9) and is missing a #6. Fortunately I had a #6 from IL&S that came with a wooden plough I bought years ago. I got lucky and the entire set does fit in one of the two wooden ploughs I bought in Germany years ago. The tool roll is quite tired, but it will serve as a pattern to make its replacement. I've ordered a 1m x 1m60  length of heavy canvas for that purpose.


I will sharpen them shortly on my Scheppach Tiger 3000 VS (a cheap German clone of Tormek I bought a couple of months back). I will first need to make a jig to ensure that the business end is square to the wheel surface as the tangs are tapering on both axis. This means I can't rely on the built-in square of the tool holder.

The next parcel is a present from my friend Brian at Toolerable. It was a heavy parcel, just shy of 10 pounds.


I had to wait until I got home at the end of the day to have a better look at the inside of the parcel:


It's a set of German-engineered dowel plates, covering from 3mm to 20mm. This is awesome as I was looking at crafting my own for round tenons. I've already tested it by knocking in a bit of 8mm dowel I bought from a big box shop and it quickly adjusted it to true 8mm diameter. I will need to try it further with various bits of straight-grain wood. Here's a video of Elia Bizzarri showing how dowel plates are used for tenon work.

Thanks a million Brian! They'll be put to good use!

Sunday, 1 July 2018

Even more tools

This morning we did a quick check of a small flea market a few minutes from the house. It's not a huge flea market, but I always seem to find hand planes there. Today was no exception, I ended up spending 3€ on a pair of planes: a round plane and a panel-raising plane.

Here they are, as found.


5 minutes on the stones brought back the round iron to working sharpness (400 - 1000 - 4000 - 8000, CrO strop).


I then cleaned up and oiled the plane body, buffed it and took it for a test drive.


Cleaning up the panel-raising plane was pretty much the same work... clean up the contact point between the iron and the chip breaker, flatten the back and bring the bevel up to 8000 grits on the stone, followed up with a quick trip to a CrO strop.


I still need to make a replacement nicker and a replacement wedge for the nicker. I have seen two design variations so far... the nicker perpendicular to the planing direction and the nicker parallel to the planing direction. Interestingly enough, the channel for the nicker seems to have been done with a drill as two sides are parallel and the other two sides are rounded. This probably means that the nicker was a later addition to the plane.

This is now my second large panel-raising plane, both with a flat profile but a different slope angle.


The left one has a Ward iron, the hardest plane iron I own so far, skewed with a sharp angled arris on the work side. The right one is the new one